Thursday, October 30

Altered notepad and pen

In my last post, I shared a stationary kit I created as a gift. In the kit, I included an altered mini legal pad and pen that are so simple to re-create. It doesn't get ANY easier than this. The PERFECT item to try and alter if you are new to altering. I saw the idea for both of these items on a blog, Thinking Inking. She included both items in a little binder kit she created.

The notepad, was a mini legal pad I bought in a 3 pack at my local Wal-Mart for a few dollars last week. They had a few color choices, but I went with white so that it'd match more choices. I've also been told they sell them at many dollar stores and all office supply stores. The color of the binding doesn't matter at all. These notepads are 3"x5". You can do pretty much anything to alter these, but I chose to stick with simplicity. I covered the existing binding with a patterned piece of cardstock from the My Mind's Eye Just Dreamy 2 set, since that is what my stationary kit was made from.

Pick the paper and cut a 3" x 4" piece. I measured how wide the binding was (3" same as the notepad) and I measured all the way from where it started on the front to where it ended after wrapping around on the back (4"). Turn the paper over, so that the side you want to show is face down. Apply adhesive to the entire piece careful to cover the edges very well. I simply used double sided Scotch tape and it worked perfect. Then lay it, sticky side down, on the front of your notepad and wrap it around carefully creasing it at the top two places it folds over and sticking it down securely as you go. That's all there is to it....easy peasy right?


For the pen, you need to buy a Pentel brand pen. Look for the ones seen here. These were $0.97 for a 2pack at Wal-Mart. I purchased blue, but they also came in black and purple. The tube of the pen is clear, but the end caps and ink vary. I took a piece of coordinating cardstock and cut it to 1"x4". Roll it up tightly around a skinny object. For me it helped to start the curling by rolling it up with a skinny pencil and then re-rolling it with an even skinnier stylus. Then you simply unscrew the bottom of the pen. The ink will stay attached to the bottom when you pull it out. Unless you want a BIG mess, don't try to take the ink off of the bottom cap....mmmkay? If you rolled it up tight enough, the paper will fit right into the cavity. As it unrolls itself inside a bit, it will fill the entire inside and leave a center hole for you to stick the inkwell back inside. I chose to take matching ribbon and wrap it around the cap a few times and then tie a bow, but that's up to how fancy you want to be with the project.


I created these items to include in a stationary kit, but they would be great on their own or with an altered journal or desk set. I hope to have the tutorial up for the box I created to house all of the items from this post and the last post asap. I would love to see your projects if you give these a try. As always, anytime you try something I post you can leave a link to your blog or online photo gallery in my comments :)

Tuesday, October 28

Stationary Box

The finished product is done....a stationary kit. It was no small fete since I'd never actually made a card before or a box or anything remotely crafty beyond a scrapbook page. I love how it turned out though. WHOO HOO!! Can we say...CHRISTMAS GIFTS!!! One down...a zillion to go. LOL.


I saw a very cool stationary box online that I tried. I gave it my all and crashed and burned. LOL. Not quite as crafy as I thought. Well I decided to buy one of those regular brown craft boxes and cover it to match the cards I made. Well, wouldn't you know it...crashed and burned at that too! Then I found one of those gift boxes that a you can get to put a shirt in before you wrap it. I took it apart where it was glued and I figured out how it worked. I did the math and figured out how to make one fit my specifications. I used 2 coordinating My Mind's Eye Just Dreamy2 line pieces of cardstock so that the lid and bottom both coordinate, then I embellished the top with a frame from the set, a scrap of cardstock to match and red Alphabities.


I used the My Mind's Eye Just Dreamy 2 line of products for everything on the cards. Except the ribbon is 9mm Grosgrain from Jo-Ann's in Coral Rose and Navy Turquoise. Also the brads are just various colors from my personal stash. There are 8 cards in total. I simply cut them to be a total of 4"x7" after folding and embellishing, because that was the size of the blank envelopes I had sitting around. They are all different, but coordinate since they are from the same line.


I also altered a pen, mini legal pad, and printed her out 8 labels with her name and address. I made a graphic for the left side using a graphic of the paper line I found online. Thank you very much Google. I just inserted that into the label template in Works for the labels I had on hand. I will add 8 stamps before giving it to her and voila.....stationary set! I will post a tutorial on how I did the pen and legal pad shortly. They were uber simple and a great idea for those wanting to start trying to alter items. I hope to get the specifications up for the gift box asap too.

Tuesday, October 21

Layouts from our vacation...

I am finally getting through all of those pictures. Here are a few of my favorites from today's scrapping. You may have seen some of the photos before because I already posted the digi layouts I did with them, but these layouts are all new.


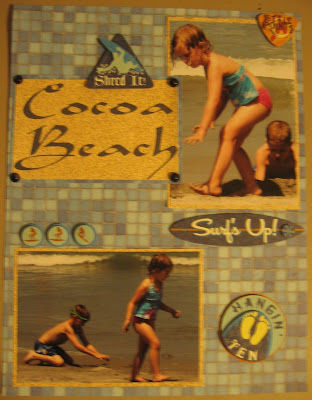
I scrap in 8.5x11 for our family album so in cutting the 12x12 sheet down I managed to lose the brand of my background paper, but it's one of my favorites. It looks like little tiles all varied colors of blue. Very pretty. The photos are doing them no justice because my camera seems to be laying down on the job. I used my printer to print up the 'Cocoa Beach' title onto sandy looking paper and then used navy skittles for the corners.


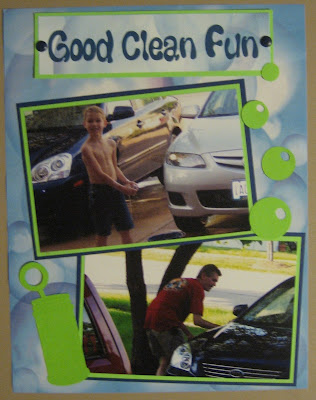
We visited my parents for the last leg of our cross country road trip. While there my dad decided to wash his car and was totally awesome and washed mine too. My son went out to help but managed to do more playing in the water than actual cleaning. The bubbles and container are all precut diecuts I bought years ago when Michael's used to sell them in the spinning carousel. I printed the title with my printer onto a leftover strip from the background paper then matted it in the same color as the inner matte from my photos.


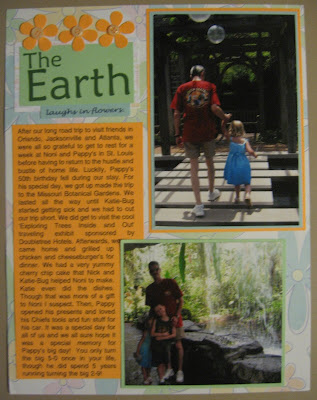
The last layout is one of my favorites I've done lately simply because I was able to fit so much journaling on it. While visiting my parents, my dad turned 50 and we spent the entire day at the Botanical Gardens, then having a cookout and other fun birthday festivities. I was able to go into great detail about all of the fun that day held so that in the next handfull of layouts to follow you would know what was going on.


It was also the first time I used a Zig brand 2-way Squeeze and Roll glue pen to attach buttons. I was worried with them being heavier it would fall right off. Nope. You have apply the glue to the paper then stick the button down and hold it for about 10 seconds. I suggest using a object to hold it like a pen with the cap on because after a bit of gluing your fingers will be a bit tacky and pull the item up when you try to move your finger away. After the 10 seconds you can move the layout somewhere to sit untouched to dry for about 5 minutes then they are down for good. If you pick them up and move them before the 5 minutes is up you will have to reapply the glue even if it still seems tacky. The reason is the glue pen is a 2-way glue pen. Meaning if you attach the item immediately it's a permanent bond, if you wait even 5 seconds it is repositionable. Chances are if you are taking the time to glue down embellishments you want them to stay there.