Morning crafty peeps. I wanted to share with you my dt submission for this week's Cut It Up challenge. We are getting a kick start on our Christmas cards and projects and what I've created is a altered notebook to keep all of our favorite holiday recipes. Would love to see what you all enter....just remember that you need to follow the Christmas theme AND use a diecut somewhere.
Hey all, quick post today. Tons going on in the Skinner casa as of late, but I didn't want you all to miss out on the super fun challenge posted over at Cut It Up challenges. The theme this week is Father's Day and don't forget you need to use some kind of diecut on your project...thus the 'cut' in Cut It Up ;)
I made a card into the shape of a charcoal BBQ grill. It swings open to show paper under that we all signed. The grill shape is a circle cut in half and the legs are simply rectangles. The handle is a square cut that I altered a bit and the font is cut from my Cricut. I am still struggling to give card making a try, but I'm just gonna keep at it! :)
I just wanted to take a moment to thank everyone who emailed, posted to my FB/twitter, etc sending well wishes for our family. As some of you know my 3yr old had a bad fall on the playground last month at preschool and knocked her noggin for a loop and broke her sweet little nose. She's been having scary side effects since that would suggest neurological trouble. A last minute DRs appt Friday ended us up admitted to the local children's hospital for 5 days. We made it home late last night, but it'll be a long road ahead of outpatient care. The CT scan, tons of blood work (seriously this kid is covered in 30+ bandaids from IVs and blood draws), 2 sedations, and MRI tests all show that her post concussive syndrome will get better with time, but for the next year or so she has to wear a helmet...unless she's laying/sitting for long periods with hand-to-hand supervision. She wasn't having it at first, but after learning she could sticker that puppy up to her heart's content...she LOVES it!
Unfortunately, or fortunately depending on how you look at it, the tests showed a problem in her sweet little head (the pituitary gland to be specific) that is wreaking havoc on lots of her other systems. Something we would have struggled to get to the bottom on more and more as she grew up, but now we accidentally happened upon it and can be very proactive to minimize the affect it has on her life. So I'm definitely counting it as a blessing! A long road ahead of us, but I'll take manageable and treatable over the alternatives you will see in a children't hospital for sure!!!!
I love this blog as well as my time away from the stress I find in paper crafting myself. So I don't plan on anything changing here. I also have enjoyed every bit of my work on my design teams and my own challenge blog. Although I have been a bit slow in mailing stuff out, commenting and responding to messages, I am still getting there. I can't imagine ever giving any of this up, especially when I am more thankful than ever for my sweet little peas and this hobby is all about them!
I just wanted to thank you all for the support. And Ms. Allie wants to thank everyone who came and visited her during our week at the hospital and who called, emailed sweet messages and sent her cards. I promise you that you all made what was an otherwise traumatic week for her, a lot brighter.
Hey everyone. Sorry I'm behind on today's posts... my littlest fell on the playground at preschool last month and broke her nose and this morning she had a checkup to see how healing is going. A checkup that I only remembered 30 minutes before it was scheduled...and we live 20minutes away...and we were still in PJs. Whoops!!!! So I didn't have time to get all my posts finalized in the race out of door. On the bright side, however...healing is going BEAUTIFULLY! ♥
Thanks for the patience. The layout below is all My Mind's Eye papers and embellies, with the exception of the buttons which were Studio G and the blue letters that are Thickers. It is my DT project for this week's stamping challenge at Scrap Your Story. I've done this stamping technique a few times and had comments on how I got it done so below I'll share. I also followed along with S.W.A.T. Drill #7 by following the top row of the bingo board stamping, doodling and 3 buttons. My doodling (there are hearts doodled along the top, the right, and the top corner as well as inside of a few hexagons with a white gel pen) goes along with this week's Paper Girls challenge as well.
Now for the promised how-to. You will notice in several of my recent layouts I had a thick white stamped pattern on the background. Such as these:
Well on my layout this week there is a hexagon stamped with the same technique on some of the patterned paper squares. How did I do it? Easy peasy..... Start with these supplies:
acrylic paint
foam brush
embossing folder
I like to add glitter in the paint sometimes. Doesn't show up well in photos, but in person it's a subtle, but awesome touch. I also like to use paper plates to spread the paint out on if I am adding glitter. If I'm not, then you can just put a dab directly on the foam brush. Then you sponge (dab not wipe) the paint onto the embossing folder of your choice. Just one side. Keep in mind that whether you choose the embossed or debossed side will decide if you get the outline of the pattern or the solid shape of the pattern. After dabbing it on, you can turn it over and use it to stamp your pattern on. If you sponge it on thicker in some places and try to be a little sloppy with your edges it will only add to the distressed look...which I totally dig. And no worries...if you wash your folder under the faucet in warm dish-soapy water...it comes perfectly clean. If you leave it for more than half and hour you may need to scrub a little, but if you hop up as soon as you are done..it literally just rinsing right away...even in the little crevices. :)
If you give it a try, shoot me a link in the comments...I'd love to come see!!!! :) :) :)
Hey all! This week at Cut It Up we are working with the theme: MAKE IT MINI. You can make a mini album, mini notecards, alter something itty bitty, tiny gifts, anything that's mini! :) For my project I chose to alter a mini notepad. I covered the stock paper that covers the top edge with double sided tape and then added patterned paper. Embellished it up and then added a magnet to the backside so it can go up on my fridge. As always, to play along you have to include a diecut...thus the CUT part of CUT it up. ;) See what they did there...lol. My diecut is the flag on the back of the owl. They are cut from the Create-a-Critter Cricut cartridge.
I'm also sharing this notepad with the challenge posed by Lynette over at Sketch N Scrap. This month they are celebrating their birthday with a whole month of daily challenges. Hers was posted on the 9th and instructed us to alter something. :) This started as a notepad...and well it's still a notepad, but it's waaaaay prettier! :)
This National Scrapbook Day (well really weekend!!) Echo Park is hosting four awesome challenges. I am smack dab in the middle of working on numero quatro as we speak, but thought I'd share my take on challenge #2 while I was waiting for something to dry on that one.
This challenge was to scrap about someone you love. Well boy, oh boy do I love my boy! He got new glasses this winter and rather than get bummed like most kids do, he decided to embrace his inner geek chic! LOL. He is the king of silly faces which is why the journaling starts with "I ♥ your silly sweetness!" It does pull out for more reasons why I love him.
All of the paper and embellishments are from the Echo Park "All About A Boy" line. The letters are from my stash, but everything else is Echo Park yumminess! TFL
Every two weeks a new diecut challenge. You simply follow the theme and include a diecut (manual or electronic) somewhere on the project and you're in! Sounds easy enough right? Well this week our challenge over at Cut It Up is Mother's Day. I created a layout all about being a mom to daughter's and how special that relationship is to me having grown up without a mom. There's lots of hidden journaling tucked behind the photo just on the right side.
This is another 8x8 for my favs from Instagram book I'm working on.
Hey guys.....long time no 'see'. Well for you it's only been 2 weeks since I utilized the autopost feature, but it feels like I haven't been here in a month. I've had a sweet little girl who got pretty badly hurt at school on the playground (bad concussion and broken nose) which is no fun anytime, especially when you are only in preschool and your mom has been put in charge of not allowing you to so much as bump your head for 3 weeks. Yeah..no pressure right?! LOL. So, I'm sure you can see why that's not conducive to Mommy getting any happy scrappy time. But that's okay, because I got LOTS of baby girl snuggly time. ♥
I'm back this week with a layout for Scrap Your Story's 10th challenge...all about FAVORITES!
Scrap your favorite moment, your favorite picture, your favorite holiday, your favorite item(s), in fact this week's challenge would be PERFECT for a list style layout.
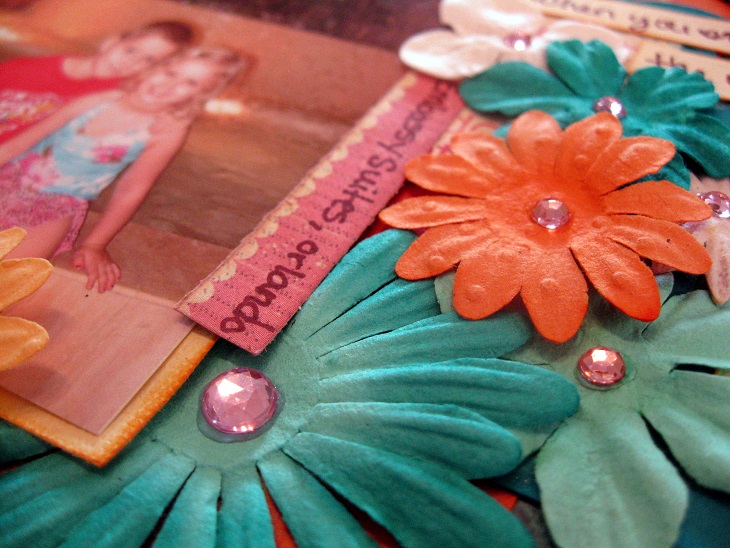
Here is my layout with a favorite photo. It was taken on a super cold snowy day when swimming just wasn't going to happen. Queue super cute suits, Mommy's jacuzzi tub and tons of bubbles. This is an 8x8 page for my 'Instagram favorites book' I'm working on.
I had a terrible time getting a decent photo. I mean...waiting for sunlight is easier said than done when I'm battling 2" of snow on the ground...in MAY!?!?! UGH! I know it's no sunny beachside community, but I live in Kansas for goodness sakes. Normally by May we are scorching. :(
I'm also sharing this layout with Southern Girls Challenges. This week they asked for projects with quotes on them. My super long title is one of my very favorite quotes that I've had written on my inspiration board for months and finally got to use it! :)
This week's challenge at Cut It Up is all about Arbor Day. Create a project with tree somewhere on it and include a diecut! My tree is cut from the Cindy Loo cricut cartridge. :) It's a little 8x8 layout for my Dad and StepMoms wedding book. They dated for over a decade before finally getting married a few years ago so I wanted to include some of my fav photos of them together from before the big wedding day. ♥
I was trying to debate making my blogger title post my normal layout title, or a short description of the theme of the post, but I have been holding inside the news for weeks and just couldn't take it anymore and this was as close to shouting it from the rooftops as blogdom allows!!! HAHA! I was chosen as a guest designer for the ultra fabulous Frosted Designs challenge blog. Oh yes, I am YIPPEEing all up in this studio!
The challenge this week is Scallops so I have light blue scallops included along the left side and also in the border along the bottom. The layout is of my daughter helping us navigate the zoo. The journaling reads:
"Our fearless tour guide. She never led us astray even though she never did learn to hold the map upright!"
Love that kid!!! The paper and embellishments are all DCWV except the letters which are The Paper Studio chipboard letters and the twine which is actually burlap I tore to shreds to make strings.
It may still be below average cold here in Kansas, but at Scrap Your Story it's SPRINGTIME!!! Here is my take on the theme:
The papers are mostly leftovers from several different lines. That's what I love about finishing up my 8.5x11 albums from a few years ago...it's easy to use lots of scraps from all my 12x12 kits!! The title is cut from graphically speaking Cricut cart. The dragonfly and flowers are rub-ons. I just love this pic of hubby and my middle daughter. Even though we were out on a nature 'hike' so they are both flushed and sweaty... I just love it!
This week marks a new challenge at Cut It Up...the fun challenge blog that pushes you to use all those fun die-cutting (electronic and manual) tools so many of us have. This week's theme is WET ...meaning anything that is or can be wet. I went with pics of my middle daughter splashing around the hotel pool on one of our vacations.
The circle element is cut from George and Basic Shapes and the title work and white wave border strip were both cut from the Luau Cartridge. The white spots were made by painting my Cuttlebug 'seeing spots' folder up and pressing it into the paper. Enough to imprint the paint, but not to emboss. The bubbles are all leftover from a sticker sheet I had with rubber duckies on it. Wish I could find more because between baby projects, bath projects and the like...I use them a lot!!!!
I bought a few cork coasters in the unfinished wood section of Hobby Lobby not too long ago and intended to cut letters out of them for a layout that papers with a really natural look to them. I fell in love and have been dying to dry little cork touches to layouts since. That is the challenge over at Scrap Your Story this week. You can cut embellishments from cork, use premade cork pieces or even faux cork patterned paper!!! I even heard about a fabulous new product called CORKSTOCK!!! Oh yes...I will have to have me some of that! :)
Dry embossing is usually reserved for the card making section of paper crafters, but it's actually a go to texture adding technique for me when creating layouts. It may seem intimidating when those little folders are often only 4x5 or 5x7 max. So I thought I'd share some of my favorite ways to add it to my layouts!
--For the purpose of this list you will see me use the brand Cuttlebug because that's what I own, but you can use the Sizzix nearly interchangeably with embossing folders and the right plate layers.-- For many of these DYI embossing techniques, I use fun foam. I've also found corrugated cardboard pieces (must be the thick corrugated kind and not plain chipboard) work fantastic.
DIY embossing. Use a stylus and fun foam to create one of a kind textured background paper. Just flip your paper face down with fun foam underneath. Doodle, draw lines, fill the background or just a patch of designs and then when you flip it over...voila. DIY embossing.
Use die cut negatives. After you cut out and use your die cut you are left with the..well with the leftovers. If you use them ass a stencil you can emboss the outline of these shapes onto your page. A bonus is if you use both the die cut and an embossed outline of the shape on the same layout!
Emboss with an embossing. This is for people who don't think they could handle freestyling a pattern *raises hand*. First run a piece of paper through your Cuttlebug with the embossing folder of your choice. Then lay a piece of fun foam down, top with paper of your choice upside down and then place your embossed sheet (debossed side up) on that. You can then use your stylus to follow along the valley's of the debossed side of the paper and will be left with a pretty close copy!
Adding bling? After you use up the last of a pretty bling swirl you can use the leftover acetate piece as a embossing stencil. It's great for when you use the bling in a cluster and then emboss the same swirl nearby in the cluster.
Diecuts. When adding diecuts to your layouts, run them through an embossing folder first for added texture. The possibilities are endless... polka dotted clouds, lines on leaves, swirly fur....
Free form embossed accent marks. This works pretty much the same as #1, but instead of starting before you create your layout, this should be done when you are almost finished. You can add corners next to your photos, or at the edges of the layout, or just outline embellishments. Just a nice little tone on tone touch.
Stenciling. You can use stencils to create your DIY embossing from #1 too. My favorite is using a straight line stencil designed for making journaling marks and making embossed lines instead of a pen ink lines to write on.
Use burlap. Burlap is just one choice, but I bet this would work with any super textured/stiff materials. Layers starting from the bottom up were A plate, C plate, fun foam, burlap, cardstock, B plate. After you run it through your machine the burlap will leave the paper with a great natural texture. Sure you can buy textured cardstock...but sometimes you need to make what you have in JUST the perfect color textured.
Vellum layers. When you emboss vellum you get a transparent layer that still adds texture without distracting too much from the things around it. You can run it through the same as cardstock.
Primas. Flower companies often offer pre-embossed flowers for you to add to layouts, but sometimes we need to work with what we've got. You can see the little added texture you'll find by just embossing a few of them in a cluster.
Got Thickers? Most of your Thickers can be run through the Cuttlebug to add an extra layer of texture before adding them to your scrapbook page.
Score-Pal. You can create awesome lines and basket weave style embossing patterns on your background paper with a stylus and scoreboard or whatever you use to score lines. It would even be awesome to create sun-rays with this idea!
Acetate embellishments. Acetate is another clear layer you can add to embellish your creation without it being too overpowering. I cut my acetate with dies and then before adding the shape to your layout, run it through an embossing folder. You can even accent the embossing by inking with a pigment ink and a sponge.
Layered papers. Many...well actually most...of my scrapbooking layouts have multiple layers of paper down before I start adding pics and embellishments. It adds awesome interest if you choose pieces that are small enough to fit in an embossing folder and run them before layering them. If you are working with a longer piece you can hide the marks that the end of the folder can create by simply covering with an embellishment or tucking it under other elements or prevent them by stopping your rollers before it gets to the end then flipping the paper around and lining up the pattern and repeating.
Cricut embossing*. I did not create a tutorial for this because there are tons on youtube that explain it perfectly. Here is one that I particularly liked because she was just so darn excited about it working..which is pretty much the reaction I had when I saw it working LOL!
Rubbings. If you place your paper on top of an open embossing folder or even an embossing plate you can rub a pencil or crayon over the paper and catch the pattern in the scribbles. This would be great in a really artsy style layout. Dry emboss ribbon*. Another fantastic tutorial that I have personally followed with huge success. I am fresh out of starch so I can't recreate it at the moment, but here is a fab tutorial for embossing ribbon with a Big Shot.
Chipboard elements. Did you know that you can run chipboard through your Cuttlebug? Now you do...you're welcome!! I used pretty thin chipboard and my stack was tight going through the machine, but you may need to adjust your sandwich if you are using thicker chipboard.
Accentuate patterned paper. If you flip your patterned paper over and try the technique in #1 it works great for outlining elements pre-printed on your patterned paper. Follow a few of the preprinted circles or lines to create a textured image. Awesome on mini book pages that won't be behind a page protector.
Crimper. Not sure what I'd do without my Fiskars crimper, but I LOOOVE it! It adds instant embossed texture to most any shape/paper.


.jpg)

.jpg)
.jpg)