I bought a few cork coasters in the unfinished wood section of Hobby Lobby not too long ago and intended to cut letters out of them for a layout that papers with a really natural look to them. I fell in love and have been dying to dry little cork touches to layouts since. That is the challenge over at Scrap Your Story this week. You can cut embellishments from cork, use premade cork pieces or even faux cork patterned paper!!! I even heard about a fabulous new product called CORKSTOCK!!! Oh yes...I will have to have me some of that! :)
Dry embossing is usually reserved for the card making section of paper crafters, but it's actually a go to texture adding technique for me when creating layouts. It may seem intimidating when those little folders are often only 4x5 or 5x7 max. So I thought I'd share some of my favorite ways to add it to my layouts!
--For the purpose of this list you will see me use the brand Cuttlebug because that's what I own, but you can use the Sizzix nearly interchangeably with embossing folders and the right plate layers.-- For many of these DYI embossing techniques, I use fun foam. I've also found corrugated cardboard pieces (must be the thick corrugated kind and not plain chipboard) work fantastic.
DIY embossing. Use a stylus and fun foam to create one of a kind textured background paper. Just flip your paper face down with fun foam underneath. Doodle, draw lines, fill the background or just a patch of designs and then when you flip it over...voila. DIY embossing.
Use die cut negatives. After you cut out and use your die cut you are left with the..well with the leftovers. If you use them ass a stencil you can emboss the outline of these shapes onto your page. A bonus is if you use both the die cut and an embossed outline of the shape on the same layout!
Emboss with an embossing. This is for people who don't think they could handle freestyling a pattern *raises hand*. First run a piece of paper through your Cuttlebug with the embossing folder of your choice. Then lay a piece of fun foam down, top with paper of your choice upside down and then place your embossed sheet (debossed side up) on that. You can then use your stylus to follow along the valley's of the debossed side of the paper and will be left with a pretty close copy!
Adding bling? After you use up the last of a pretty bling swirl you can use the leftover acetate piece as a embossing stencil. It's great for when you use the bling in a cluster and then emboss the same swirl nearby in the cluster.
Diecuts. When adding diecuts to your layouts, run them through an embossing folder first for added texture. The possibilities are endless... polka dotted clouds, lines on leaves, swirly fur....
Free form embossed accent marks. This works pretty much the same as #1, but instead of starting before you create your layout, this should be done when you are almost finished. You can add corners next to your photos, or at the edges of the layout, or just outline embellishments. Just a nice little tone on tone touch.
Stenciling. You can use stencils to create your DIY embossing from #1 too. My favorite is using a straight line stencil designed for making journaling marks and making embossed lines instead of a pen ink lines to write on.
Use burlap. Burlap is just one choice, but I bet this would work with any super textured/stiff materials. Layers starting from the bottom up were A plate, C plate, fun foam, burlap, cardstock, B plate. After you run it through your machine the burlap will leave the paper with a great natural texture. Sure you can buy textured cardstock...but sometimes you need to make what you have in JUST the perfect color textured.
Vellum layers. When you emboss vellum you get a transparent layer that still adds texture without distracting too much from the things around it. You can run it through the same as cardstock.
Primas. Flower companies often offer pre-embossed flowers for you to add to layouts, but sometimes we need to work with what we've got. You can see the little added texture you'll find by just embossing a few of them in a cluster.
Got Thickers? Most of your Thickers can be run through the Cuttlebug to add an extra layer of texture before adding them to your scrapbook page.
Score-Pal. You can create awesome lines and basket weave style embossing patterns on your background paper with a stylus and scoreboard or whatever you use to score lines. It would even be awesome to create sun-rays with this idea!
Acetate embellishments. Acetate is another clear layer you can add to embellish your creation without it being too overpowering. I cut my acetate with dies and then before adding the shape to your layout, run it through an embossing folder. You can even accent the embossing by inking with a pigment ink and a sponge.
Layered papers. Many...well actually most...of my scrapbooking layouts have multiple layers of paper down before I start adding pics and embellishments. It adds awesome interest if you choose pieces that are small enough to fit in an embossing folder and run them before layering them. If you are working with a longer piece you can hide the marks that the end of the folder can create by simply covering with an embellishment or tucking it under other elements or prevent them by stopping your rollers before it gets to the end then flipping the paper around and lining up the pattern and repeating.
Cricut embossing*. I did not create a tutorial for this because there are tons on youtube that explain it perfectly. Here is one that I particularly liked because she was just so darn excited about it working..which is pretty much the reaction I had when I saw it working LOL!
Rubbings. If you place your paper on top of an open embossing folder or even an embossing plate you can rub a pencil or crayon over the paper and catch the pattern in the scribbles. This would be great in a really artsy style layout. Dry emboss ribbon*. Another fantastic tutorial that I have personally followed with huge success. I am fresh out of starch so I can't recreate it at the moment, but here is a fab tutorial for embossing ribbon with a Big Shot.
Chipboard elements. Did you know that you can run chipboard through your Cuttlebug? Now you do...you're welcome!! I used pretty thin chipboard and my stack was tight going through the machine, but you may need to adjust your sandwich if you are using thicker chipboard.
Accentuate patterned paper. If you flip your patterned paper over and try the technique in #1 it works great for outlining elements pre-printed on your patterned paper. Follow a few of the preprinted circles or lines to create a textured image. Awesome on mini book pages that won't be behind a page protector.
Crimper. Not sure what I'd do without my Fiskars crimper, but I LOOOVE it! It adds instant embossed texture to most any shape/paper.
This week over at Scrap Your Story the challenge is to take the cardmaker's favorite technique of embossing and add it to a scrapbooking layout! You will see the DT did a good job of mixing it up with some heat embossing and some dry embossing.
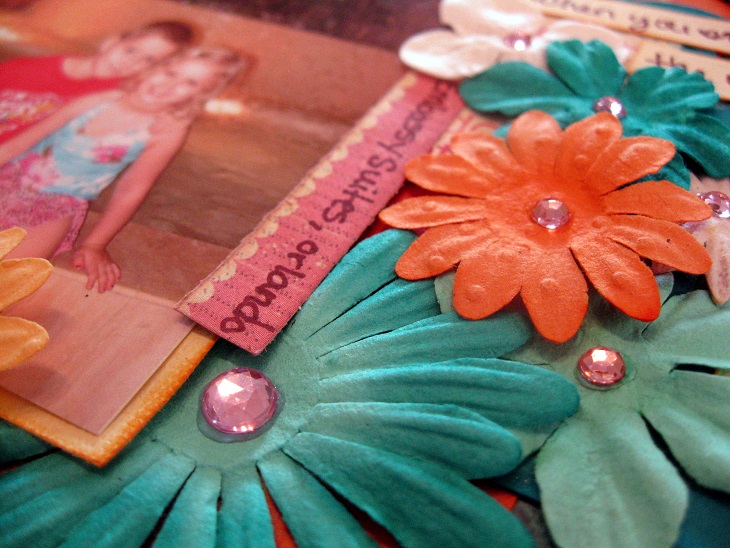
My layout is using all of the new Authentique Spring line. :) If you look closely you will see the long skinny paper strip is dry embossed with the new Cuttlebug honeycomb embossing folder. :) So after you take a look, click over and see what the rest of the creative team has to wow you with and then jump in and play! There is this fabulous prize that will be drawn for in a few days:
I am also submitting this layout to two other challenges. Crafty Creations is also having an embossing challenge (how lucky is THAT!?!) and even though it's a primarily card challenge blog, they allow other paper crafts. Same with Divas by Design that is currently running a Babies and Toddlers challenge and my middle sweet pea was an adorable 2yrs old in these photos! :)
That is the theme this week at Cut It Up Challenges. To participate you have to make a project including either a lamb or a lion and it MUST have a diecut (cricut, silhouette, cuttlebug, spellbinders, sizzix, etc) somewhere on the as well. Make sure you list what die/cartridge/cut you used.
I made a card using the lamb cut from the Create-a-Critter cricut cartridge and the word 'thank' is from the Cindy Loo cartridge, :)
As some of you may have heard, Google has decided to shut down their popular Google Reader application. Not sure if that will mean an end to the 'blogs I follow' list at the bottom of my dashboard or just the use of the Reader you can choose to view them with on the right side just above that list. But to be safe, I've imported my massive fav blogs list into a new reader. Feel free to continue to 'follow' me through Google in case that list doesn't disappear, but you can also follow me via BlogLovin' by clicking below (the button is also in the sidebar). I also have a 'follow by email' link to the right, but now sure the status on that come July considering it's run by Google Feedburner? If you have any input at all about this big Google announcement, I'd love to hear about it....comment below!
Only a few more days until the official arrival of Spring, but the weather here in Kansas City has officially decided to get with the program! ;) Here is my layout for this week's challenge at Anything But a Card. The theme is Spring. Head on over to play along!!!
I also saw that the challenge over at Southern Girls and is to use a tag in or for your project so I made this fun little jounaling tag to add to my layout. :)
All cutesy titles aside...how AMAZING is this new Authentique line. It's the new Spring collection and I am in LOOOOOOOVE!!!! This is actually a 2pager, but I can't share the other side just yet, but be on the lookout soon for more of this gorgeous paper line. And until then...get your booty to your nearest scrappy store and buy a piece...or every piece. Yes, definitely every piece! ;)
This layout is my DT contribution for the new challenge blog Scrap Your Story. We are on week 3 already and up is a sketch challenge. We have a fun 2pic sketch by moi, but as you can see....you are free to flip it, rotate it, tweak it, etc. I exchanged the two long pics for one tall pic, but otherwise it's mostly the same even though I made a 8.5x11 layout. :)
I had been eyeballing this tutorial for folded chevrons on my pinterest boards for days and then happened to notice the current challenge at Frosted Designs is...CHEVRONS!!! It was just the push I needed to jump in and give it a go. I followed the tutorial basically with one big difference. I wanted smaller chevrons. Her tutorial shows a 2" thick chevron and I wanted one that was only 1" so I cut all the numbers in half. Not only did I start with a 12"x1" strip instead, but after some trouble shooting figured out I also needed to make my marks/snips at alternating 1/2" marks instead of 1". So keep that in mind if you alter the width of your initial strip, you need to make your alternating marks/cuts smaller/bigger with the same ratio. :)
The paper line is more of my My Mind's Eye My Girl line (with bits of the Boy Crazy line as well). I'm trying to make use of every single sheet of that because I just LOVE it! You'll notice it in the layout I posted just before this one as well as the Thing 1 and Thing 2 layout a few posts before that! :) I still have enough for 2-3 more layouts easy!
Hey everyone! Finally a project I can share!!! I've been working on finishing up some DT projects and have to sit on those for a bit, so I've been slacking on the blog posts! Here is a new 8.5 x 11 layout I created following the March sketch posted at Sketchbook365. I used up more of my Boy Crazy by MME line. TFL
Any of you that may have visited my home here in blogdom, may have noticed that it's been having a bit of an identity crisis. I've flipped, I've flopped. I've gone sunshiney yellow (my personal fav color), I've gone black and white, hot pink and a whole rainbow of designs in between. All I knew for sure was I wanted something pretty and colorful, yet soft and not too distracting. That's quite the combo of ideals, huh?! Well I think I found a happy middle ground that I am loving more and more each time I hit reload.
In the name of a good make-over I updated my headshot, reworked my bio (just click 'about me' in the link bar above) and added links just over there -----> where you can see where else I hang out in online. I have 5000+ pins all neatly placed between dozens of OCD friendly boards that you can eyeball by clicking on the banner with the 'P' on it. My online gallery is now hosted at 2Peas, but can still be found by clicking the flicker banner (someone needs to get on making a set of social media icons that includes a 2Peas button...just sayin'!) And for those that would like to play nice and make friends with a fellow paper-crafter, click the banner with a 'T' on it to be transported to my spot in Twitterverse. As an added bonus, I gave my Twitter profile a matching facelift!
There is not much I enjoy more than sitting at a desk filled with beautiful patterned papers, rich tones of cardstock and awesome textured embellishments and being able to translate memories into keepsakes for the people that have given me all of my most prized memories.
So, with that said... I would LOVE your feedback on the new blog design I've put together. How are the fonts and text colors to read? Are the colors eye-catching enough? Too overwhelming? Images the right proportion? And also, how does it display on other devices/broswers? I have Chrome and it looked fine on my laptop and hubby's netbook that also runs Chrome, but would be curious if it looks a-ok across the board. The elements are all created from freebies found on Cutest Blog on the Block and credited to VNdigital art.
I would call week 1 of Scrap Your Story a big success!!! We had so many great entries and some just blew my mind. Don't forget to check back tomorrow to see if you were in the top 3, but starting today you can play along with week 2...ANIMALS!!! That's right, incorporate photos of animals (or people in an animal costume even!!!) or animal themed embellishments. Add just one critter or a whole menagerie...follow your inner wild child. ;)
Here is my layout .... an 8x8 of my daughter with my parents dog, Foxy.
I wish I could give you a product list here, but 100% of
this layout including the letters were just scraps saved
from my should I/shouldn't I throw them out yet pile. :)
So what are you waiting for?!?! Head on over to Scrap Your Story and play along...don't forget to read the rules in the top link bar. :)
I posted last week my excitement over being picked to design with the Cut It Up challenge site. I have been a longtime fan of my Cuttlebug and all the dies that go with it, but last year after receiving my Cricut from 'Santa' I decided to really focus on incorporating more diecuts into my layouts. I already use them on most of my cards because I am such a lousy stamper, but adding them to my layouts was just something I never tried. The whole idea of these challenges is to follow their theme while including a diecut (any machine...manual or electronic). Perfect right?!?!?! Well except I didn't even use my own machines for this first challenge. HAHAHA....but there is next week. ;)
The theme this week is Dr. Seuss inspired and rather than just being inspired by the themes in one of his books, I decided to go literal and use it as an excuse to scrap pics of my kids at Universal in their Thing 1 & Thing 2 shirts. So I had a friend cut me some adorable blue haired diecuts with her Silhouette and voila....
Click HERE to play along this week and you to could win...
I've been a little MIA the past week. Lots of DT and guest DT work on my calendar for the month of March and I'm determined not to fall behind. On top of that today marks the launch of several months in the making.....the Scrap Your Story Challenge blog!!! WHOO HOO...so EXCITED!!! Our first challenge is Just One Photo. Yep, it's really that easy....any theme, any supplies, any colors, any size...just one photo only please. Here is my contribution to the whole buncha inspiration you will find from the rest of the creative team.
As an added 'bonus', I thought I might share the sketch that I created when trying to come up with an idea for this layout. As you will see, I can't even stick that closely to my own sketches....HA!
Click on over to Scrap Your Story to be inspired, play along and maybe win a prize along the way. In fact, here is a picture of the prize you are playing for if you play along with us at all this month!!


.png)
