

--For the purpose of this list you will see me use the brand Cuttlebug because that's what I own, but you can use the Sizzix nearly interchangeably with embossing folders and the right plate layers.-- For many of these DYI embossing techniques, I use fun foam. I've also found corrugated cardboard pieces (must be the thick corrugated kind and not plain chipboard) work fantastic.
DIY embossing. Use a stylus and fun foam to create one of a kind textured background paper. Just flip your paper face down with fun foam underneath. Doodle, draw lines, fill the background or just a patch of designs and then when you flip it over...voila. DIY embossing.


Diecuts. When adding diecuts to your layouts, run them through an embossing folder first for added texture. The possibilities are endless... polka dotted clouds, lines on leaves, swirly fur....

Free form embossed accent marks. This works pretty much the same as #1, but instead of starting before you create your layout, this should be done when you are almost finished. You can add corners next to your photos, or at the edges of the layout, or just outline embellishments. Just a nice little tone on tone touch.

Stenciling. You can use stencils to create your DIY embossing from #1 too. My favorite is using a straight line stencil designed for making journaling marks and making embossed lines instead of a pen ink lines to write on.
Use burlap. Burlap is just one choice, but I bet this would work with any super textured/stiff materials. Layers starting from the bottom up were A plate, C plate, fun foam, burlap, cardstock, B plate. After you run it through your machine the burlap will leave the paper with a great natural texture. Sure you can buy textured cardstock...but sometimes you need to make what you have in JUST the perfect color textured.

Vellum layers. When you emboss vellum you get a transparent layer that still adds texture without distracting too much from the things around it. You can run it through the same as cardstock.

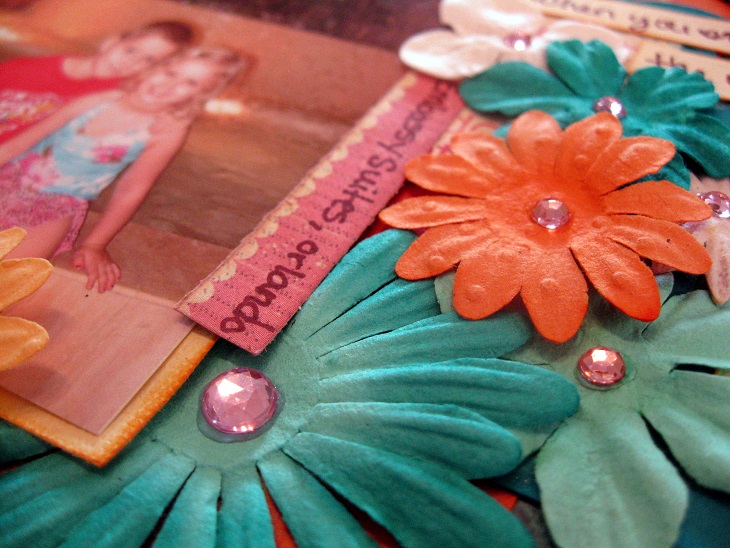
Primas. Flower companies often offer pre-embossed flowers for you to add to layouts, but sometimes we need to work with what we've got. You can see the little added texture you'll find by just embossing a few of them in a cluster.
Got Thickers? Most of your Thickers can be run through the Cuttlebug to add an extra layer of texture before adding them to your scrapbook page.

Score-Pal. You can create awesome lines and basket weave style embossing patterns on your background paper with a stylus and scoreboard or whatever you use to score lines. It would even be awesome to create sun-rays with this idea!
Acetate embellishments. Acetate is another clear layer you can add to embellish your creation without it being too overpowering. I cut my acetate with dies and then before adding the shape to your layout, run it through an embossing folder. You can even accent the embossing by inking with a pigment ink and a sponge.

Layered papers. Many...well actually most...of my scrapbooking layouts have multiple layers of paper down before I start adding pics and embellishments. It adds awesome interest if you choose pieces that are small enough to fit in an embossing folder and run them before layering them. If you are working with a longer piece you can hide the marks that the end of the folder can create by simply covering with an embellishment or tucking it under other elements or prevent them by stopping your rollers before it gets to the end then flipping the paper around and lining up the pattern and repeating.

Cricut embossing*. I did not create a tutorial for this because there are tons on youtube that explain it perfectly. Here is one that I particularly liked because she was just so darn excited about it working..which is pretty much the reaction I had when I saw it working LOL!
Rubbings. If you place your paper on top of an open embossing folder or even an embossing plate you can rub a pencil or crayon over the paper and catch the pattern in the scribbles. This would be great in a really artsy style layout.
Dry emboss ribbon*. Another fantastic tutorial that I have personally followed with huge success. I am fresh out of starch so I can't recreate it at the moment, but here is a fab tutorial for embossing ribbon with a Big Shot.
Chipboard elements. Did you know that you can run chipboard through your Cuttlebug? Now you do...you're welcome!! I used pretty thin chipboard and my stack was tight going through the machine, but you may need to adjust your sandwich if you are using thicker chipboard.

Accentuate patterned paper. If you flip your patterned paper over and try the technique in #1 it works great for outlining elements pre-printed on your patterned paper. Follow a few of the preprinted circles or lines to create a textured image. Awesome on mini book pages that won't be behind a page protector.
Crimper. Not sure what I'd do without my Fiskars crimper, but I LOOOVE it! It adds instant embossed texture to most any shape/paper.

*And because I like to give credit where credit is due. The dry embossed ribbon technique is credited to Barb Mullikin. The cricut tutorial was created by Joy. ALL other photos are of my own work ©Christina Willman-Skinner. Hope some of these ideas help kick start your own creativity!!! :) :) :)
Thanks for visiting!
♥

Very cool tips!! Thanks for sharing!!
ReplyDeleteChristy how cool is this post. Thank you for sharing. I have a cuttlebug which I just love and a million folders :/ but it is the tool that I use the most so I justify it that way. I didnt know that you could emboss ribbon. That is so cool and I had forgotten about embossing flowers. So I just want to say thanks for reminding me of all the things I can do. I just love this hobby... even when things go out of fashion there is a new way to use it. <3
ReplyDeleteI need to try embossing. Thanks for sharing.
ReplyDeleteThanks for all the great ideas x
ReplyDelete